> ## Documentation Index
> Fetch the complete documentation index at: https://docs.calstudio.com/llms.txt
> Use this file to discover all available pages before exploring further.
# Custom Domain for Studios
> Connect your AI Studio to your own domain for a fully branded experience
Custom domains for Studios allow you to publish your entire AI Studio marketplace on your own branded domain, giving your users a seamless experience under your own URL.
## Overview
When you connect a custom domain to your Studio, all the apps within that Studio become accessible under your branded domain. This is ideal for:
* Creating a professional AI marketplace or portal under your brand
* Providing a unified experience for all your AI apps
* Building trust with your audience through a recognizable URL
* Removing CalStudio branding from your Studio
## Prerequisites
Before setting up a custom domain for your Studio, ensure you have:
Custom domains are available on Pro plans and above
Your Studio must be published and live before adding a custom domain
A registered domain with DNS management access
## Step-by-Step Setup Process
### Step 1: Navigate to Your Studios
1. Log in to your [CalStudio dashboard](https://calstudio.com/dashboard)
2. Go to the **Studios** page to see your list of Studios
### Step 2: Open Studio Options
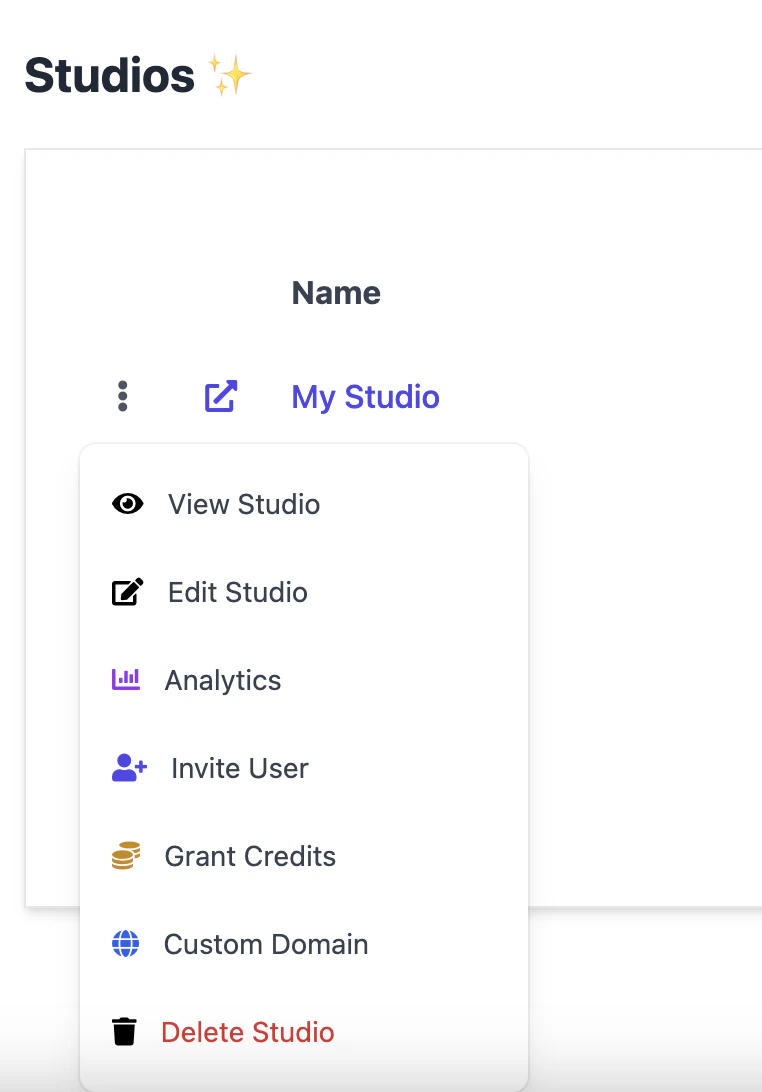
1. Find the Studio you want to connect a custom domain to
2. Click the **three-dot menu** (⋮) next to the Studio name
3. You'll see the following options:
* View Studio
* Edit Studio
* Analytics
* Invite User
* Grant Credits
* **Custom Domain**
* Delete Studio
 ### Step 3: Enter Your Domain
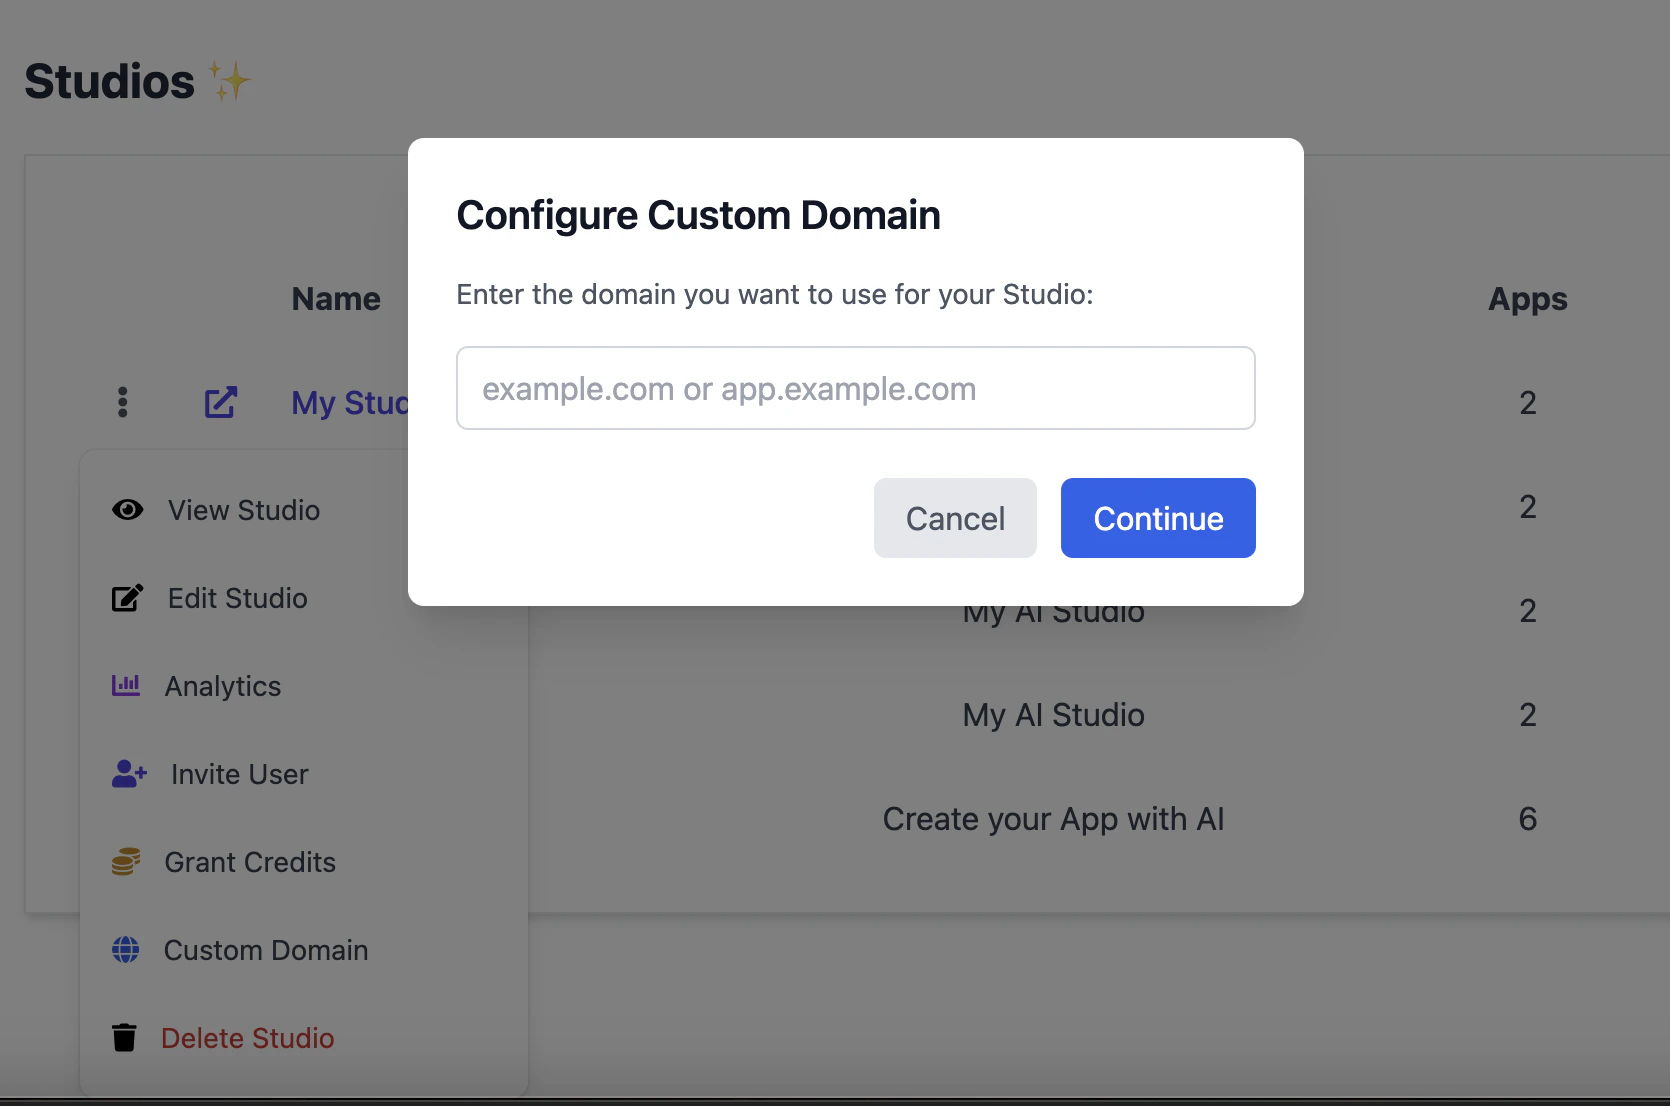
1. Click **"Custom Domain"** from the menu
2. The **Configure Custom Domain** dialog will appear
3. Enter the domain you want to use for your Studio:
* **Root domain**: `yourdomain.com`
* **Subdomain**: `app.yourdomain.com` or `studio.yourdomain.com`
4. Click **"Continue"**
### Step 3: Enter Your Domain
1. Click **"Custom Domain"** from the menu
2. The **Configure Custom Domain** dialog will appear
3. Enter the domain you want to use for your Studio:
* **Root domain**: `yourdomain.com`
* **Subdomain**: `app.yourdomain.com` or `studio.yourdomain.com`
4. Click **"Continue"**
 ### Step 4: Configure DNS Records
After clicking Continue, CalStudio will provide you with **CNAME records** to add to your DNS provider.
For subdomains like `studio.yourdomain.com`, you'll receive two CNAME records:
1. **SSL Certificate Validation Record**:
* This CNAME record is required for SSL certificate validation
* It will have a long, unique name starting with an underscore
* The value points to AWS Certificate Manager for validation
```
Type: CNAME
Name: _abc123... (provided by CalStudio)
Value: _xyz789....acm-validations.aws
TTL: 3600 (or default)
```
2. **Studio CNAME Record**:
* This points your subdomain to your CalStudio Studio
* Name: Your chosen subdomain (e.g., `studio`)
* Value: An AWS load balancer URL
```
Type: CNAME
Name: studio (or your chosen subdomain)
Value: [provided-by-calstudio].elb.amazonaws.com
TTL: 3600 (or default)
```
Subdomains are recommended because they are easier to configure and don't affect your main website or email settings.
For root domains like `yourdomain.com`:
1. **You'll receive NS (Name Server) records** from CalStudio
2. These will be AWS Route 53 nameservers
3. At your domain registrar, update your nameservers to the provided AWS records:
```
ns-1234.awsdns-12.org
ns-5678.awsdns-34.co.uk
ns-9012.awsdns-56.com
ns-3456.awsdns-78.net
```
4. This process can take 24-48 hours to propagate globally
NS delegation affects your entire domain. All existing DNS records (including email, subdomains, etc.) will need to be recreated in the new DNS system. Consider using a subdomain instead if you have existing services on your root domain.
### Step 5: Add Records to Your DNS Provider
Add the CNAME records to your DNS provider. Here's how for popular providers:
1. Log in to Cloudflare dashboard
2. Select your domain
3. Go to **DNS** > **Records**
4. Click **Add record**
**For the SSL validation record:**
* Type: CNAME
* Name: Paste the long underscore name (e.g., `_ce016fc2...`)
* Target: Paste the AWS validation value
* Proxy status: **DNS only** (gray cloud)
* TTL: Auto
**For the subdomain record:**
* Type: CNAME
* Name: Your subdomain (e.g., `studio`)
* Target: Paste the AWS load balancer URL
* Proxy status: **DNS only** (gray cloud)
* TTL: Auto
1. Sign in to GoDaddy Domain Control Center
2. Select your domain
3. Click **DNS** > **Manage DNS**
4. Click **ADD** under records
**For each CNAME record:**
* Type: CNAME
* Host: The record name (remove your domain from the end if GoDaddy adds it)
* Points to: The target value
* TTL: 1 hour
5. Save both records
1. Sign in to Namecheap
2. Go to **Domain List** > **Manage**
3. Select **Advanced DNS**
4. Click **Add New Record**
**For each CNAME record:**
* Type: CNAME Record
* Host: The record name (without your domain)
* Value: The target value
* TTL: Automatic
5. Save all changes
1. Sign in to Google Domains
2. Click your domain
3. Go to **DNS** > **Manage custom records**
4. Click **Create new record**
**For each CNAME record:**
* Type: CNAME
* Host name: The record name
* Data: The target value
* TTL: 1 hour
5. Save both records
### Step 6: Verify Deployment
1. **Wait for DNS propagation** (usually 5-30 minutes for CNAME, up to 48 hours for NS)
2. Visit your custom domain in the browser
3. Your Studio and all its apps should now be live at your domain
Use [DNS Checker](https://dnschecker.org) to verify your DNS records have propagated globally.
## SSL Certificates
CalStudio automatically provisions and manages SSL certificates for all custom domains using AWS Certificate Manager. Your Studio will be served securely over HTTPS — no additional configuration required.
## Troubleshooting
* Make sure your Studio is **live** (published). Custom domains can only be added to live Studios.
* Verify DNS records are correctly configured
* Check for typos in the domain name
* Ensure no conflicting A or AAAA records exist
* Contact support at [support@calstudio.com](mailto:support@calstudio.com) with your domain details
* CalStudio automatically handles SSL certificates
* If using Cloudflare, ensure proxy is disabled (DNS only)
* Allow up to 24 hours for certificate provisioning
* Ensure the SSL validation CNAME record is correctly added
* This occurs with NS delegation for root domains
* You'll need to recreate MX records in the new DNS system
* Consider using a subdomain instead to avoid email issues
* Open the Studio options menu and click **Custom Domain**
* Remove the domain in the CalStudio dashboard
* Then update/remove DNS records at your provider
* Your Studio will revert to its default CalStudio URL
## Next Steps
Set up custom domains for individual AI apps
Remove all CalStudio branding (Pro Plus)
### Step 4: Configure DNS Records
After clicking Continue, CalStudio will provide you with **CNAME records** to add to your DNS provider.
For subdomains like `studio.yourdomain.com`, you'll receive two CNAME records:
1. **SSL Certificate Validation Record**:
* This CNAME record is required for SSL certificate validation
* It will have a long, unique name starting with an underscore
* The value points to AWS Certificate Manager for validation
```
Type: CNAME
Name: _abc123... (provided by CalStudio)
Value: _xyz789....acm-validations.aws
TTL: 3600 (or default)
```
2. **Studio CNAME Record**:
* This points your subdomain to your CalStudio Studio
* Name: Your chosen subdomain (e.g., `studio`)
* Value: An AWS load balancer URL
```
Type: CNAME
Name: studio (or your chosen subdomain)
Value: [provided-by-calstudio].elb.amazonaws.com
TTL: 3600 (or default)
```
Subdomains are recommended because they are easier to configure and don't affect your main website or email settings.
For root domains like `yourdomain.com`:
1. **You'll receive NS (Name Server) records** from CalStudio
2. These will be AWS Route 53 nameservers
3. At your domain registrar, update your nameservers to the provided AWS records:
```
ns-1234.awsdns-12.org
ns-5678.awsdns-34.co.uk
ns-9012.awsdns-56.com
ns-3456.awsdns-78.net
```
4. This process can take 24-48 hours to propagate globally
NS delegation affects your entire domain. All existing DNS records (including email, subdomains, etc.) will need to be recreated in the new DNS system. Consider using a subdomain instead if you have existing services on your root domain.
### Step 5: Add Records to Your DNS Provider
Add the CNAME records to your DNS provider. Here's how for popular providers:
1. Log in to Cloudflare dashboard
2. Select your domain
3. Go to **DNS** > **Records**
4. Click **Add record**
**For the SSL validation record:**
* Type: CNAME
* Name: Paste the long underscore name (e.g., `_ce016fc2...`)
* Target: Paste the AWS validation value
* Proxy status: **DNS only** (gray cloud)
* TTL: Auto
**For the subdomain record:**
* Type: CNAME
* Name: Your subdomain (e.g., `studio`)
* Target: Paste the AWS load balancer URL
* Proxy status: **DNS only** (gray cloud)
* TTL: Auto
1. Sign in to GoDaddy Domain Control Center
2. Select your domain
3. Click **DNS** > **Manage DNS**
4. Click **ADD** under records
**For each CNAME record:**
* Type: CNAME
* Host: The record name (remove your domain from the end if GoDaddy adds it)
* Points to: The target value
* TTL: 1 hour
5. Save both records
1. Sign in to Namecheap
2. Go to **Domain List** > **Manage**
3. Select **Advanced DNS**
4. Click **Add New Record**
**For each CNAME record:**
* Type: CNAME Record
* Host: The record name (without your domain)
* Value: The target value
* TTL: Automatic
5. Save all changes
1. Sign in to Google Domains
2. Click your domain
3. Go to **DNS** > **Manage custom records**
4. Click **Create new record**
**For each CNAME record:**
* Type: CNAME
* Host name: The record name
* Data: The target value
* TTL: 1 hour
5. Save both records
### Step 6: Verify Deployment
1. **Wait for DNS propagation** (usually 5-30 minutes for CNAME, up to 48 hours for NS)
2. Visit your custom domain in the browser
3. Your Studio and all its apps should now be live at your domain
Use [DNS Checker](https://dnschecker.org) to verify your DNS records have propagated globally.
## SSL Certificates
CalStudio automatically provisions and manages SSL certificates for all custom domains using AWS Certificate Manager. Your Studio will be served securely over HTTPS — no additional configuration required.
## Troubleshooting
* Make sure your Studio is **live** (published). Custom domains can only be added to live Studios.
* Verify DNS records are correctly configured
* Check for typos in the domain name
* Ensure no conflicting A or AAAA records exist
* Contact support at [support@calstudio.com](mailto:support@calstudio.com) with your domain details
* CalStudio automatically handles SSL certificates
* If using Cloudflare, ensure proxy is disabled (DNS only)
* Allow up to 24 hours for certificate provisioning
* Ensure the SSL validation CNAME record is correctly added
* This occurs with NS delegation for root domains
* You'll need to recreate MX records in the new DNS system
* Consider using a subdomain instead to avoid email issues
* Open the Studio options menu and click **Custom Domain**
* Remove the domain in the CalStudio dashboard
* Then update/remove DNS records at your provider
* Your Studio will revert to its default CalStudio URL
## Next Steps
Set up custom domains for individual AI apps
Remove all CalStudio branding (Pro Plus)