> ## Documentation Index
> Fetch the complete documentation index at: https://docs.calstudio.com/llms.txt
> Use this file to discover all available pages before exploring further.
# Custom Domain
> Connect your AI apps to your own domain for professional branding
Custom domains allow you to publish your CalStudio AI apps and App Studios on your own branded domain, providing a seamless experience for your users without any CalStudio branding.
## Overview
Custom domains solve a major limitation of AI chatbots - the ability to share and deploy them on your own website. With CalStudio, you can:
* Host your AI apps on your own domain (e.g., `yourdomain.com` or `chat.yourdomain.com`)
* Share your apps publicly without requiring user sign-ups
* Maintain complete brand consistency
* Build trust with professional URLs
* Improve SEO and discoverability
* Embed apps directly on your existing website
## Prerequisites
Before setting up a custom domain, ensure you have:
Custom domains are available on Pro plans and above
A registered domain with DNS management access
## Step-by-Step Setup Process
### Step 1: Sign Up and Access Dashboard
1. Sign up on the [CalStudio platform](https://calstudio.com/)
2. Once signed up, you'll see your dashboard
### Step 2: Create Your AI App
1. Click on the **"Create App"** button in your dashboard
2. Fill out the app creation form with:
* **App Name**: Choose a descriptive name
* **Description**: Brief explanation of your app's purpose
* **AI Model**: Select your preferred model (GPT-4, GPT-3.5, Claude, etc.)
* **System Prompt**: Define your AI's behavior and personality
* **Knowledge Base**: Optionally upload files for your AI to reference
3. Click **"Create App"** to generate your AI application
### Step 3: Test and Launch Your App
1. Test your app thoroughly using the built-in chat interface
2. Make any necessary adjustments to the prompt or settings
3. When satisfied, click **"Launch"** to make it publicly available
### Step 4: Publish to Custom Domain
1. In your app's dashboard, find the **Status** row
2. Click on the **"Publish"** option
3. Select **"Custom Domain"** from the publishing options
4. Enter your desired domain:
* **Root domain**: `yourdomain.com`
* **Subdomain**: `app.yourdomain.com` or `chat.yourdomain.com`
### Step 5: Configure DNS Settings
CalStudio will provide DNS records based on your domain type:
For subdomains like `chat.yourdomain.com`:
1. **You'll receive a CNAME record** from CalStudio
2. Add this record to your DNS provider:
```
Type: CNAME
Name: chat (or your chosen subdomain)
Value: [provided-by-calstudio].calstudio.app
TTL: 3600 (or default)
```
3. Save your DNS changes
Subdomains are easier to configure and don't affect your main website or email settings.
For root domains like `yourdomain.com`:
1. **You'll receive NS (Name Server) records** from CalStudio
2. These will be AWS Route 53 nameservers (not CalStudio nameservers)
3. At your domain registrar, update your nameservers to the provided AWS records, which typically look like:
```
ns-1234.awsdns-12.org
ns-5678.awsdns-34.co.uk
ns-9012.awsdns-56.com
ns-3456.awsdns-78.net
```
4. This process can take 24-48 hours to propagate globally
NS delegation affects your entire domain. All existing DNS records (including email, subdomains, etc.) will need to be recreated in the new DNS system. Consider using a subdomain instead if you have existing services on your root domain.
### Step 6: Verify Deployment
1. **Wait for DNS propagation** (usually 5-30 minutes for CNAME, up to 48 hours for NS)
2. Visit your custom domain
3. Your AI app should now be live!
Use [DNS Checker](https://dnschecker.org) to verify your DNS records have propagated globally.
## Visual Walkthrough
Follow these step-by-step instructions to publish your Custom GPT to a custom domain using CalStudio.
### 1. Sign Up on CalStudio
Navigate to [CalStudio](https://calstudio.com/) and create your account to get started.

### 2. Create Your App
Once you have signed up, click on the "Create App" button in your dashboard.

### 3. Configure Your AI App
Fill out the form with the necessary details:
* Select the AI model of your choice (GPT-4, GPT-3.5, Claude, etc.)
* Add a name and description
* Define the system prompt
* Optionally, add a knowledge base for your AI bot

### 4. Test and Launch
Click on "Create App" and you'll have your Custom GPT app created in the dashboard. Test this app and launch it, making it available to anyone publicly.

### 5. Publish to Custom Domain
To publish the app on a custom domain, click on the Publish option under the status row:
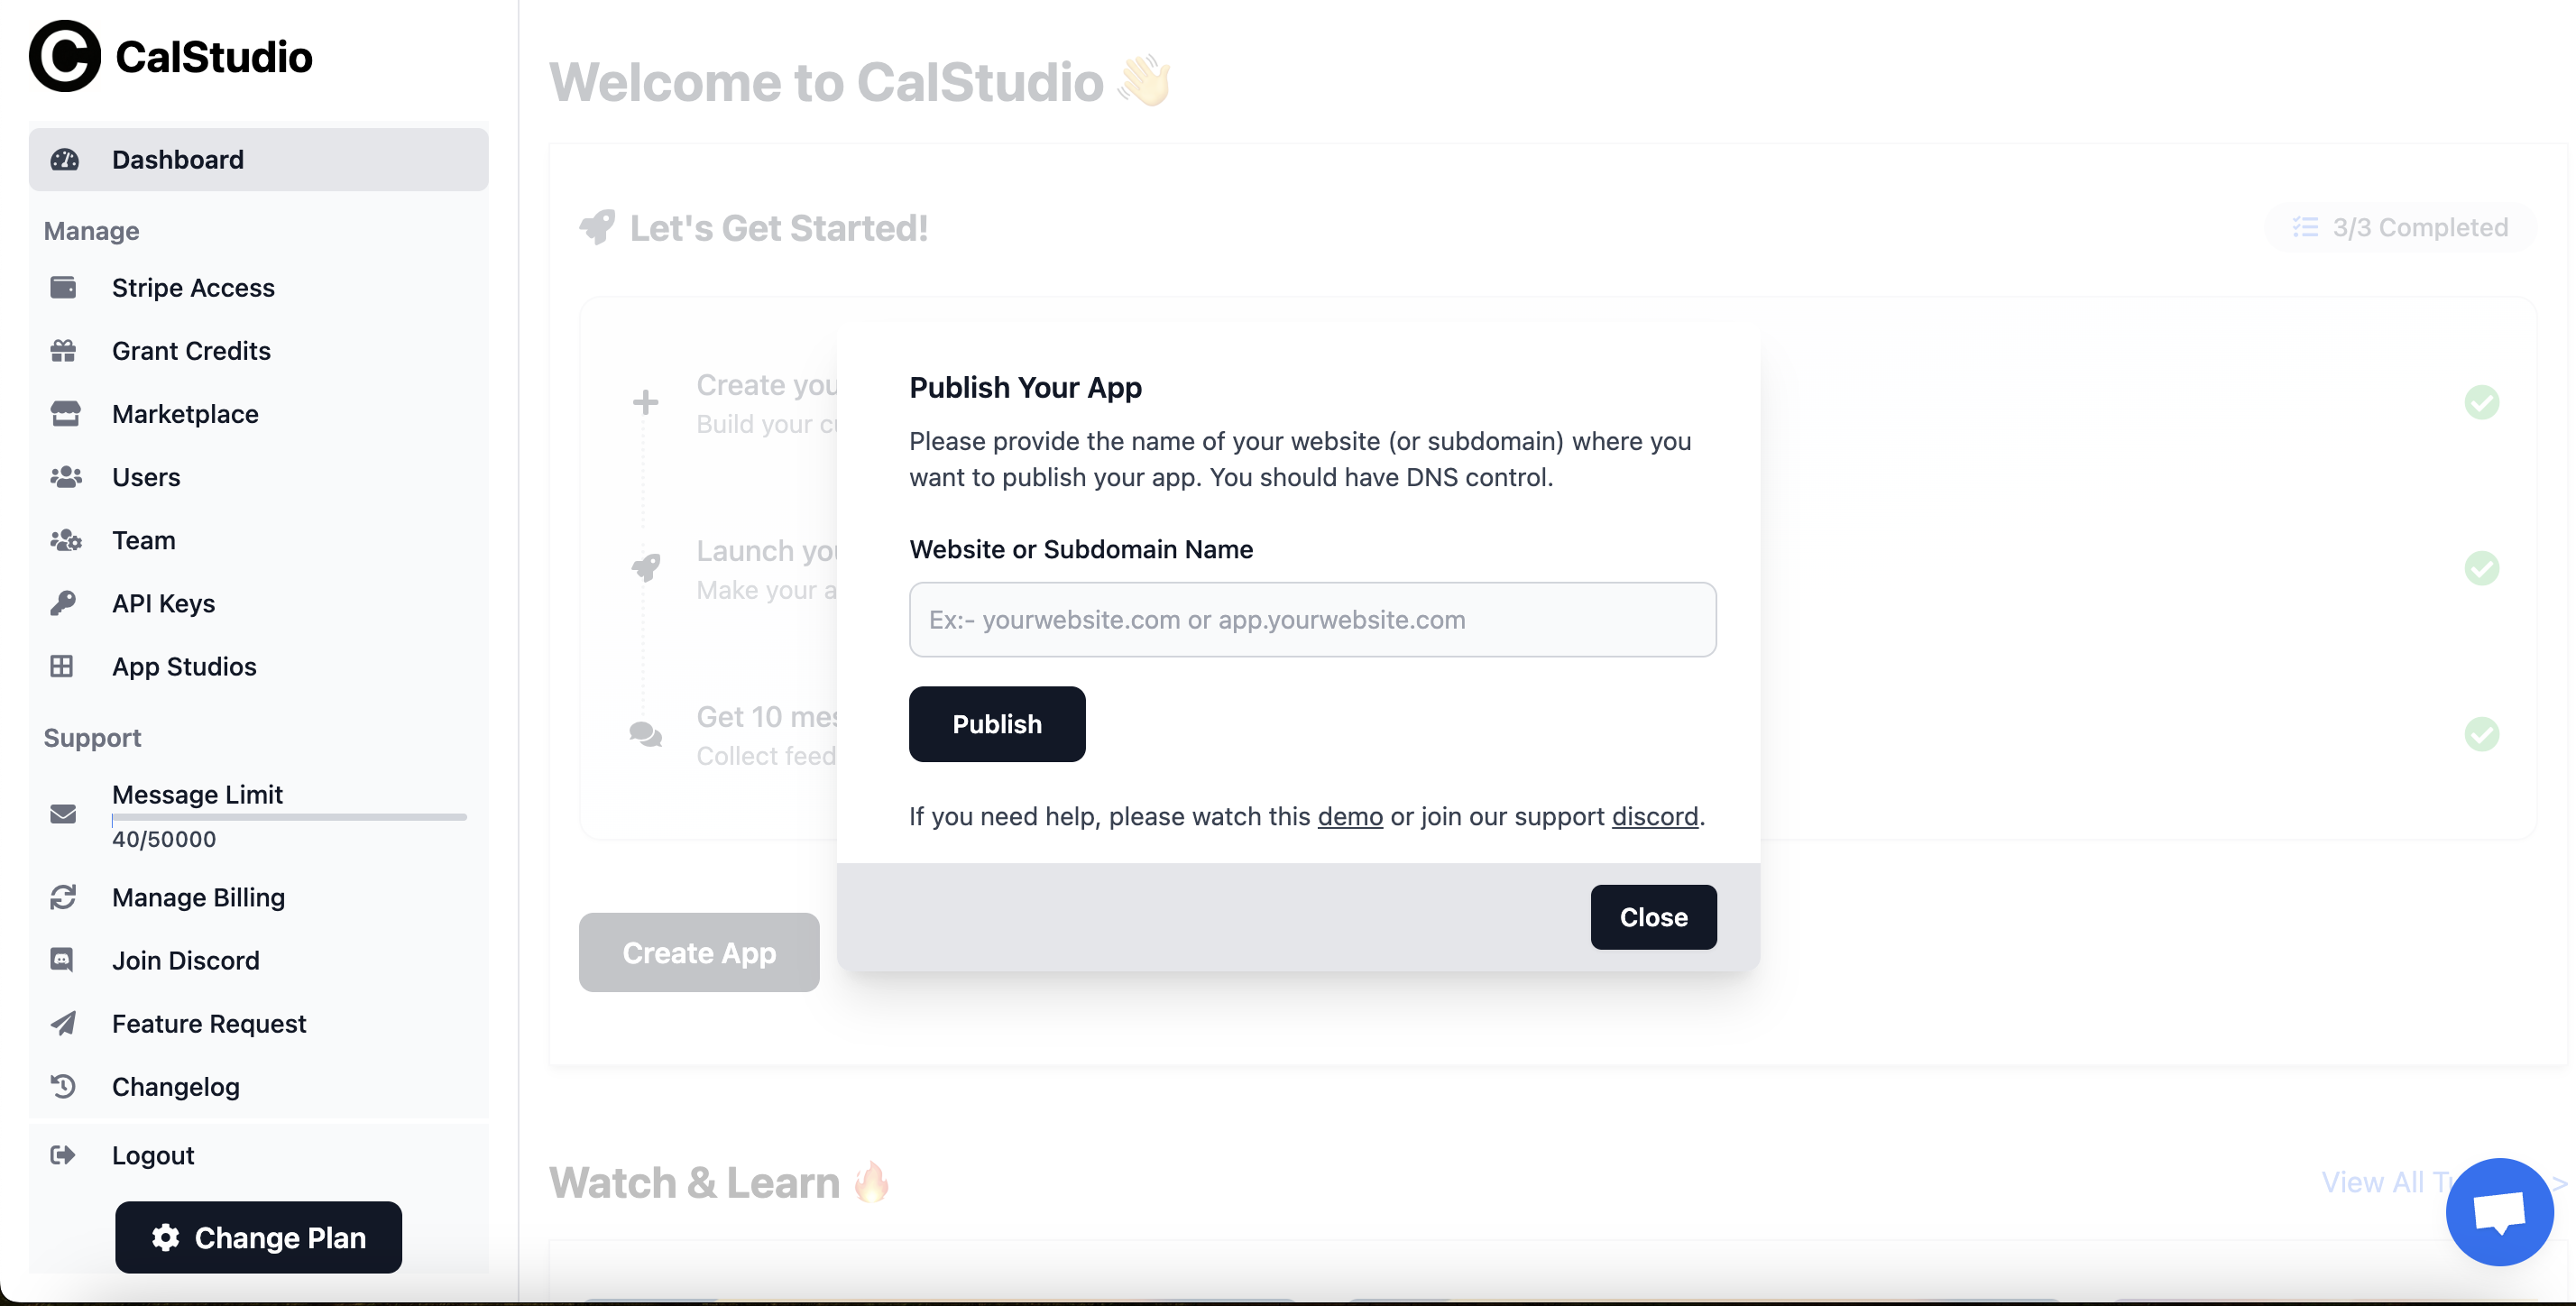
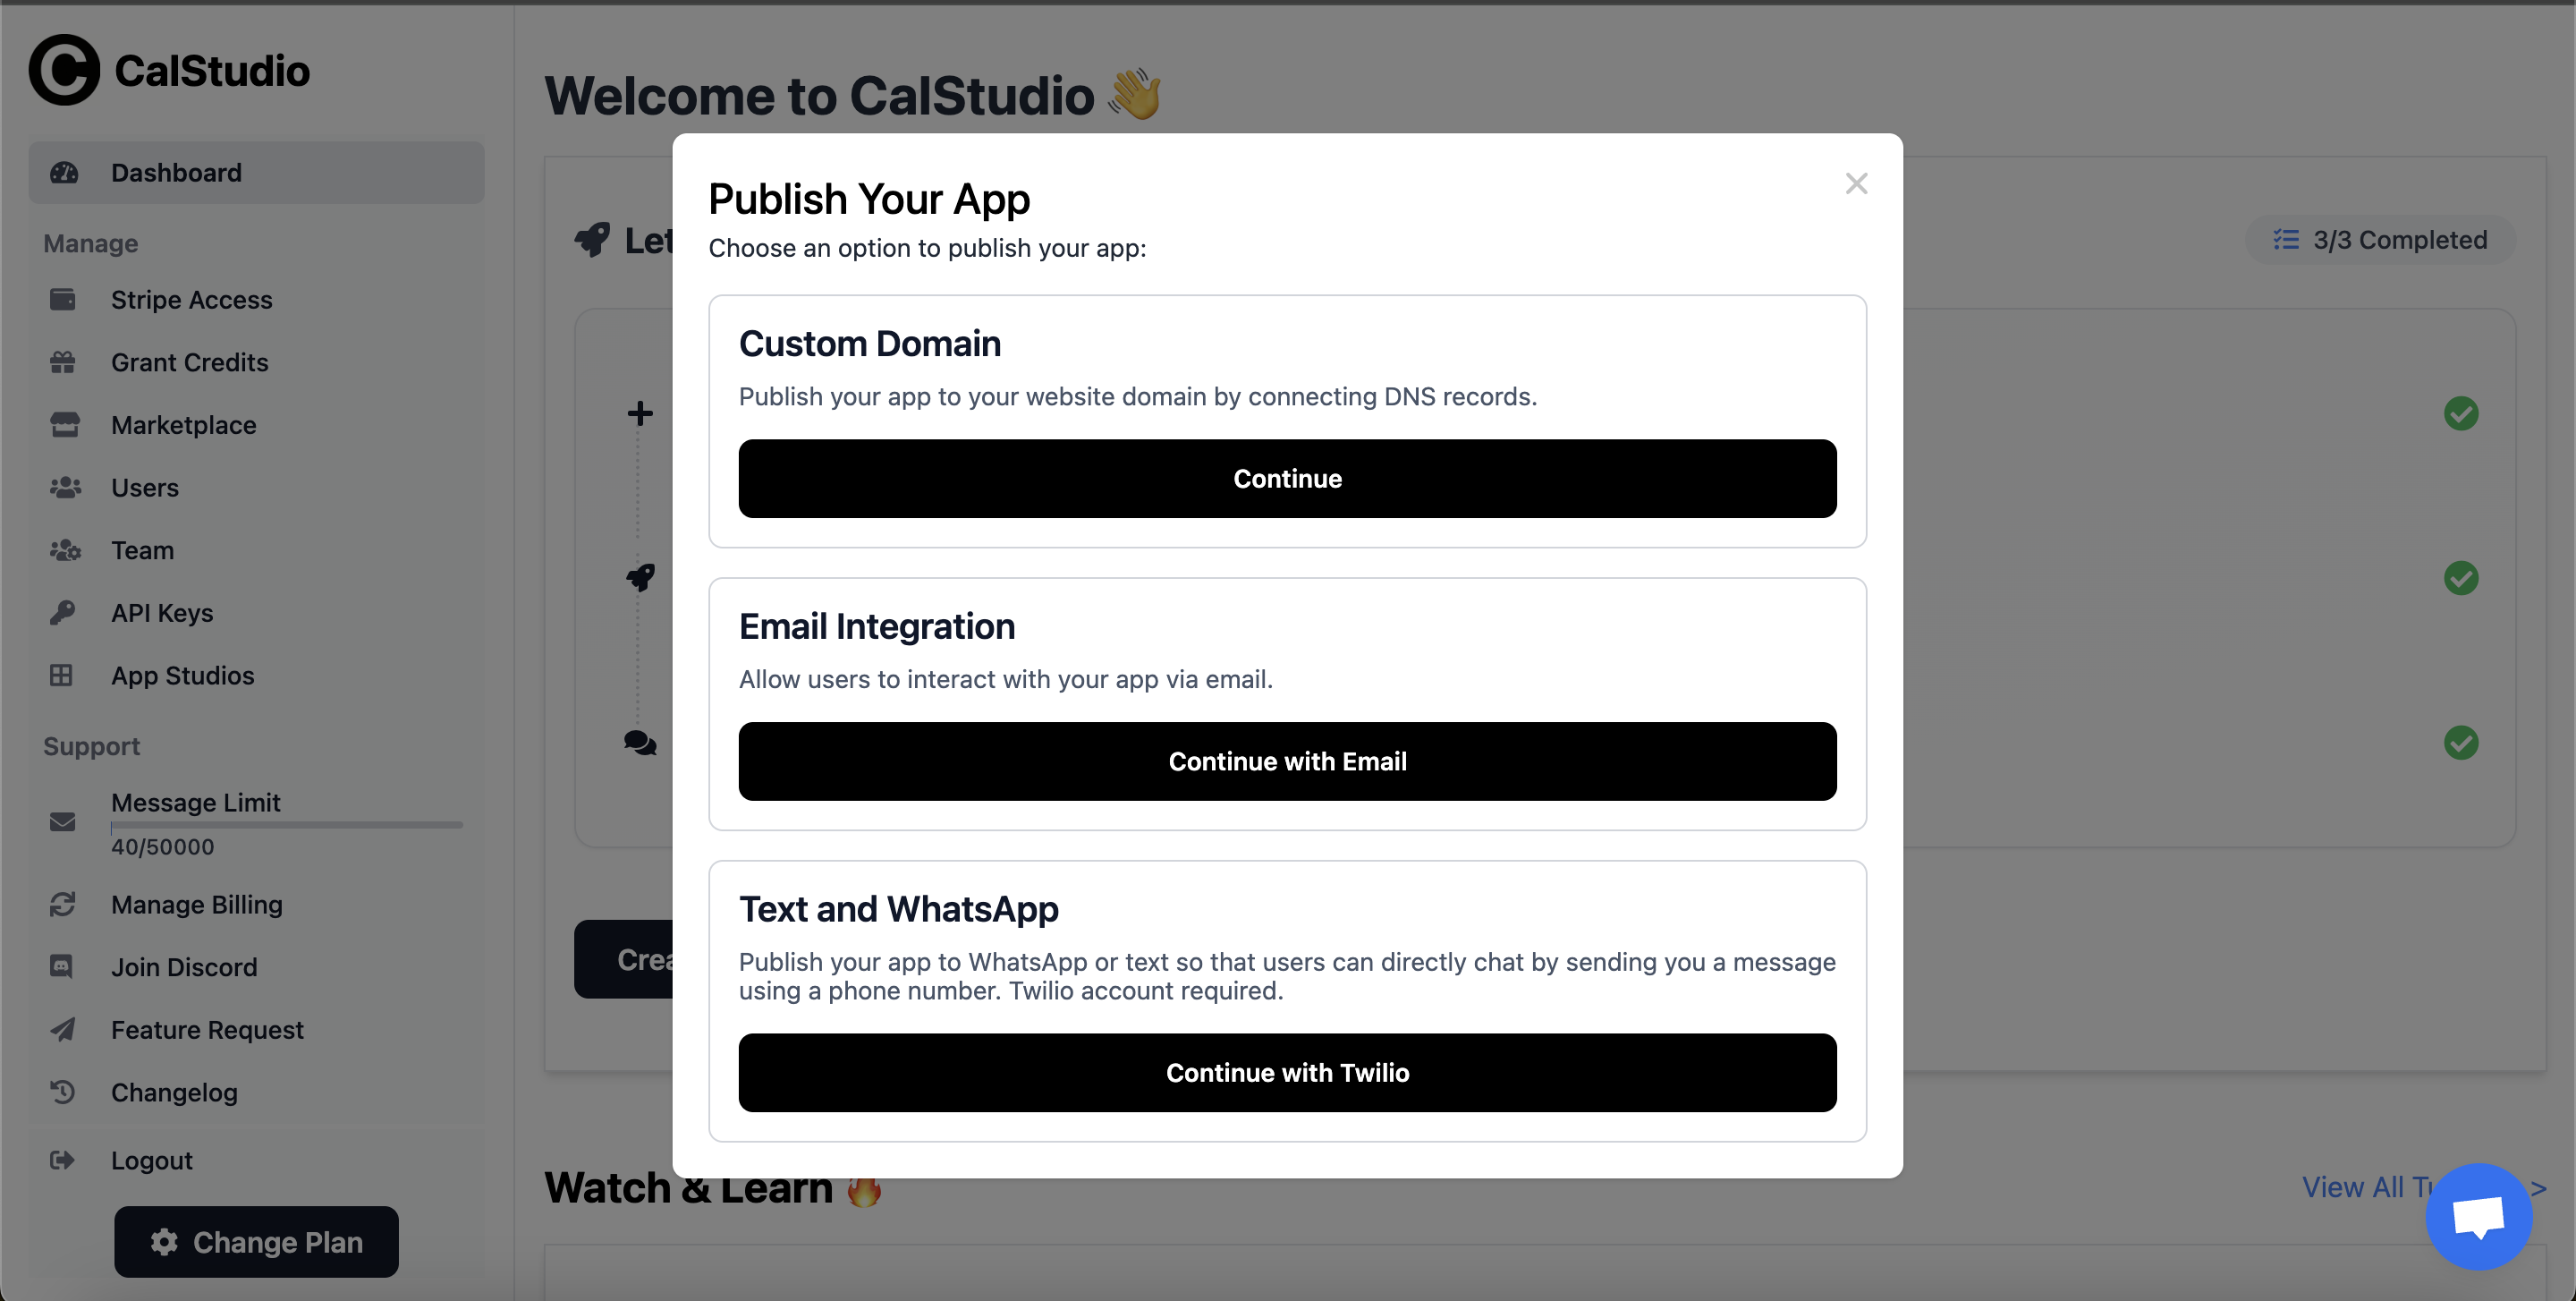 Select "Custom Domain" to publish it to a custom domain. You'll then need to provide the domain name:
 ### 6. Configure DNS Records
After entering your domain, you'll receive DNS records to configure:
#### For Subdomains
When publishing to a subdomain (e.g., `app.yourdomain.com`), you'll receive two CNAME records:
### 6. Configure DNS Records
After entering your domain, you'll receive DNS records to configure:
#### For Subdomains
When publishing to a subdomain (e.g., `app.yourdomain.com`), you'll receive two CNAME records:
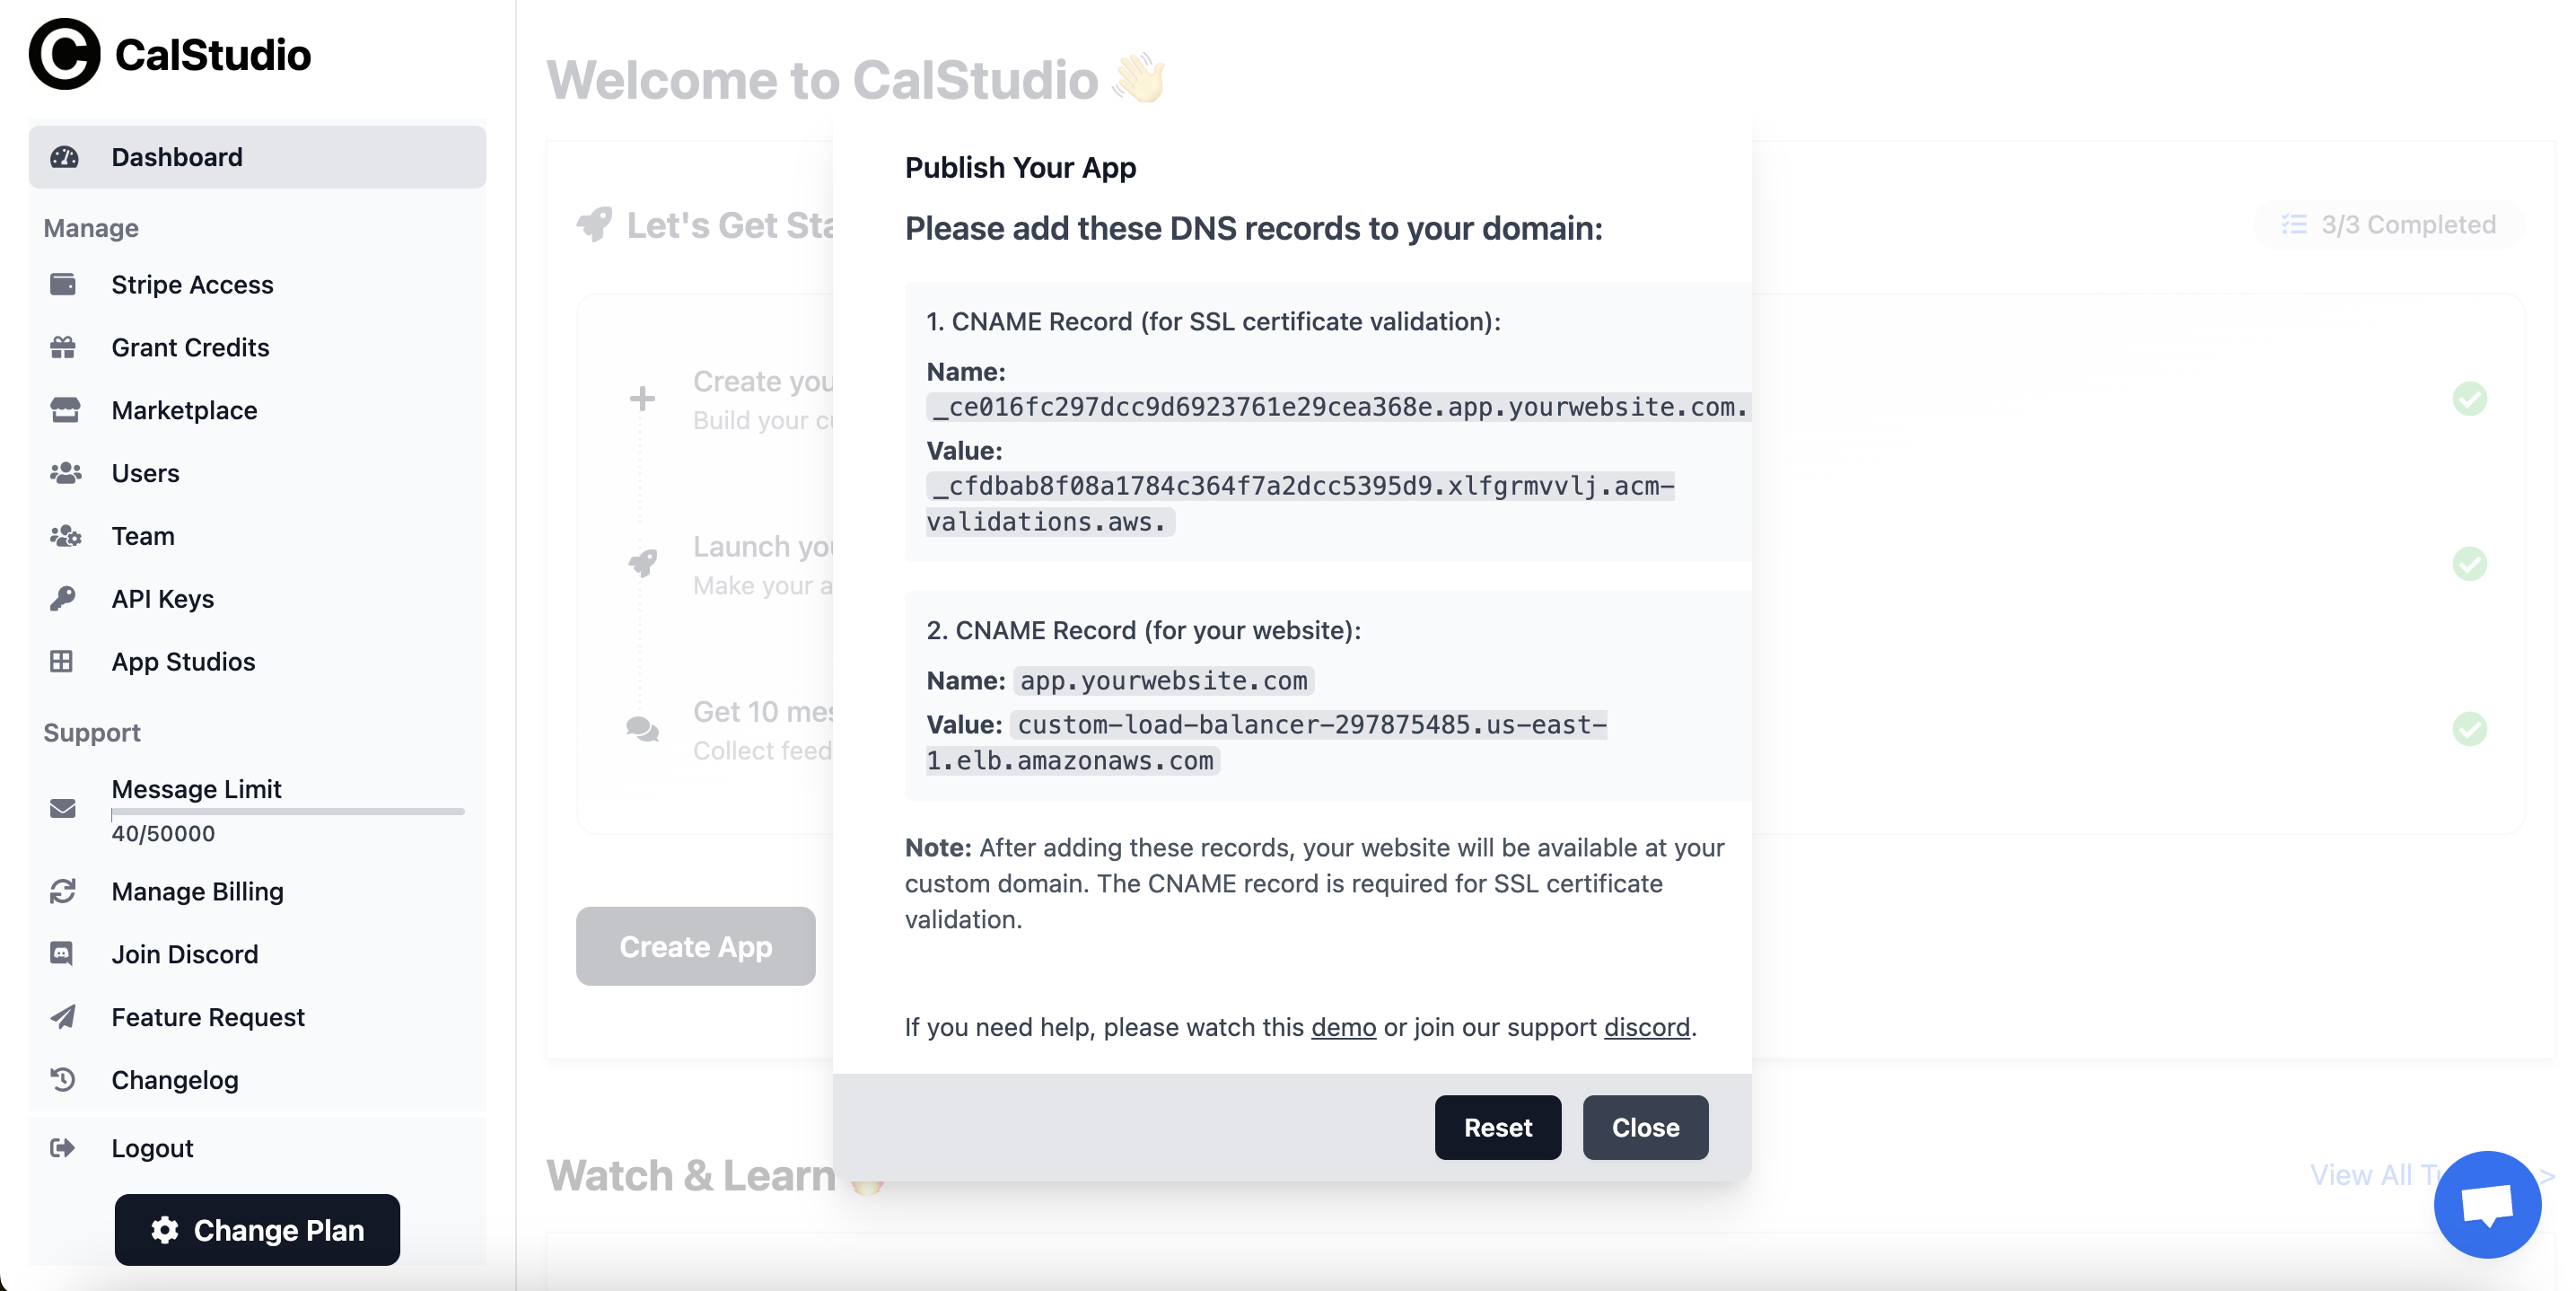 **Example records you'll receive:**
1. **SSL Certificate Validation Record**:
* This CNAME record is required for SSL certificate validation
* It will have a long, unique name starting with an underscore
* The value points to AWS Certificate Manager for validation
2. **Website CNAME Record**:
* This points your subdomain to your CalStudio app
* Name: Your chosen subdomain (e.g., `app.yourdomain.com`)
* Value: An AWS load balancer URL
**Important:** After adding these records, your website will be available at your custom domain. The first CNAME record is specifically for SSL certificate validation.
#### For Root Domains
Root domains will receive NS (nameserver) records as described in the DNS settings section above.
## Video Tutorial
For a detailed video walkthrough of the custom domain setup process, watch this [helpful tutorial](https://youtu.be/z2jqALQbSbk).
## Studio Custom Domains
Studios can also be published to custom domains, allowing you to create your own AI marketplace under your branded domain. For the full step-by-step guide, see the dedicated [Custom Domain for Studios](/account/studio-custom-domain) page.
## SSL Certificates
CalStudio automatically provisions and manages SSL certificates for all custom domains using AWS Certificate Manager. Your app will be served securely over HTTPS.
## Best Practices
Subdomains are easier to manage and don't affect your main website
Thoroughly test your app before connecting a production domain
Set up monitoring to ensure your custom domain stays accessible
Document your DNS configuration for future reference
## How to Add CNAME Records
Here's how to add the two CNAME records in popular DNS providers:
1. Log in to Cloudflare dashboard
2. Select your domain
3. Go to **DNS** → **Records**
4. Click **Add record**
**For the SSL validation record:**
* Type: CNAME
* Name: Paste the long underscore name (e.g., `_ce016fc2...`)
* Target: Paste the AWS validation value
* Proxy status: **DNS only** (gray cloud)
* TTL: Auto
**For the subdomain record:**
* Type: CNAME
* Name: Your subdomain (e.g., `app`)
* Target: Paste the AWS load balancer URL
* Proxy status: **DNS only** (gray cloud)
* TTL: Auto
1. Sign in to GoDaddy Domain Control Center
2. Select your domain
3. Click **DNS** → **Manage DNS**
4. Click **ADD** under records
**For each CNAME record:**
* Type: CNAME
* Host: The record name (remove your domain from the end if GoDaddy adds it)
* Points to: The target value
* TTL: 1 hour
5. Save both records
1. Sign in to Namecheap
2. Go to **Domain List** → **Manage**
3. Select **Advanced DNS**
4. Click **Add New Record**
**For each CNAME record:**
* Type: CNAME Record
* Host: The record name (without your domain)
* Value: The target value
* TTL: Automatic
5. Save all changes
1. Sign in to Google Domains
2. Click your domain
3. Go to **DNS** → **Manage custom records**
4. Click **Create new record**
**For each CNAME record:**
* Type: CNAME
* Host name: The record name
* Data: The target value
* TTL: 1 hour
5. Save both records
## Troubleshooting
* Verify DNS records are correctly configured
* Check for typos in the domain name
* Ensure no conflicting A or AAAA records exist
* Contact support with your domain details
* CalStudio automatically handles SSL certificates
* If using Cloudflare, ensure proxy is disabled (DNS only)
* Allow up to 24 hours for certificate provisioning
* This occurs with NS delegation
* You'll need to recreate MX records in CalStudio's DNS manager
* Consider using a subdomain instead to avoid email issues
* Remove the domain in CalStudio dashboard first
* Then update/remove DNS records at your provider
* Your app will revert to the CalStudio subdomain
## Next Steps
Remove all CalStudio branding (Pro Plus)
Embed your AI app on existing websites
**Example records you'll receive:**
1. **SSL Certificate Validation Record**:
* This CNAME record is required for SSL certificate validation
* It will have a long, unique name starting with an underscore
* The value points to AWS Certificate Manager for validation
2. **Website CNAME Record**:
* This points your subdomain to your CalStudio app
* Name: Your chosen subdomain (e.g., `app.yourdomain.com`)
* Value: An AWS load balancer URL
**Important:** After adding these records, your website will be available at your custom domain. The first CNAME record is specifically for SSL certificate validation.
#### For Root Domains
Root domains will receive NS (nameserver) records as described in the DNS settings section above.
## Video Tutorial
For a detailed video walkthrough of the custom domain setup process, watch this [helpful tutorial](https://youtu.be/z2jqALQbSbk).
## Studio Custom Domains
Studios can also be published to custom domains, allowing you to create your own AI marketplace under your branded domain. For the full step-by-step guide, see the dedicated [Custom Domain for Studios](/account/studio-custom-domain) page.
## SSL Certificates
CalStudio automatically provisions and manages SSL certificates for all custom domains using AWS Certificate Manager. Your app will be served securely over HTTPS.
## Best Practices
Subdomains are easier to manage and don't affect your main website
Thoroughly test your app before connecting a production domain
Set up monitoring to ensure your custom domain stays accessible
Document your DNS configuration for future reference
## How to Add CNAME Records
Here's how to add the two CNAME records in popular DNS providers:
1. Log in to Cloudflare dashboard
2. Select your domain
3. Go to **DNS** → **Records**
4. Click **Add record**
**For the SSL validation record:**
* Type: CNAME
* Name: Paste the long underscore name (e.g., `_ce016fc2...`)
* Target: Paste the AWS validation value
* Proxy status: **DNS only** (gray cloud)
* TTL: Auto
**For the subdomain record:**
* Type: CNAME
* Name: Your subdomain (e.g., `app`)
* Target: Paste the AWS load balancer URL
* Proxy status: **DNS only** (gray cloud)
* TTL: Auto
1. Sign in to GoDaddy Domain Control Center
2. Select your domain
3. Click **DNS** → **Manage DNS**
4. Click **ADD** under records
**For each CNAME record:**
* Type: CNAME
* Host: The record name (remove your domain from the end if GoDaddy adds it)
* Points to: The target value
* TTL: 1 hour
5. Save both records
1. Sign in to Namecheap
2. Go to **Domain List** → **Manage**
3. Select **Advanced DNS**
4. Click **Add New Record**
**For each CNAME record:**
* Type: CNAME Record
* Host: The record name (without your domain)
* Value: The target value
* TTL: Automatic
5. Save all changes
1. Sign in to Google Domains
2. Click your domain
3. Go to **DNS** → **Manage custom records**
4. Click **Create new record**
**For each CNAME record:**
* Type: CNAME
* Host name: The record name
* Data: The target value
* TTL: 1 hour
5. Save both records
## Troubleshooting
* Verify DNS records are correctly configured
* Check for typos in the domain name
* Ensure no conflicting A or AAAA records exist
* Contact support with your domain details
* CalStudio automatically handles SSL certificates
* If using Cloudflare, ensure proxy is disabled (DNS only)
* Allow up to 24 hours for certificate provisioning
* This occurs with NS delegation
* You'll need to recreate MX records in CalStudio's DNS manager
* Consider using a subdomain instead to avoid email issues
* Remove the domain in CalStudio dashboard first
* Then update/remove DNS records at your provider
* Your app will revert to the CalStudio subdomain
## Next Steps
Remove all CalStudio branding (Pro Plus)
Embed your AI app on existing websites